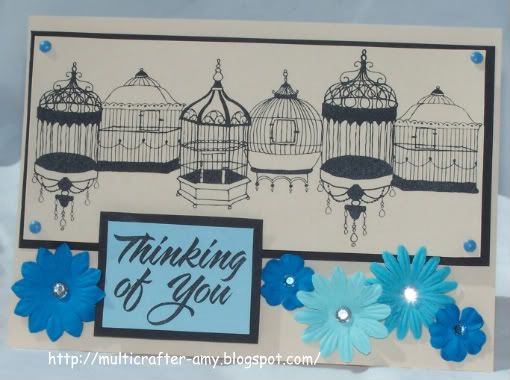
I spent the morning playing with my Yudu Cardshop yesterday. This is the first card I have made from all the prints I made. If you plan to get one of these toys, watch the directions/project dvd that comes with it. It is very handy and Jinger does a great job showing you how to use the Yudu Cardshop.
Here are the tips I have for you after I used it.
What I used to make the card:
Birdcage image screen and Sentiment screen that came with my Yudu Cardshop HSN version.
Tan card stock, black card stock and light blue card stock.
Blue brads on the four corners of the birdcage screen print.
Foam dots to pop up the birdcages and sentiment.
Blue shades of paper flowers and rhinestones in their centers.
I will post more cards from this as I complete them.
1. Packing tape works great to block what you don't want to print. It's fairly cheap. I used a generic brand that worked perfect. It comes off easy with water. You should still take it slow when you remove it.
2. Have plenty of paper towels handy.
3. When you go to use the ink. Remove the inside foil so the ink will come out. lol
4. Have a scrap piece of paper handy to lay your squeegee down on between prints.
5. Have all the paper you want to print on cut and ready so you don't waste time between each print that you do. The ink dries fast.
6. Do not become discouraged if your first few prints do not turn out. I did three before I got a good print. It takes a few tries to figure out the pressure you need to use to get a clear print. Also if you get globs (your print is not clear) You are using to much ink. I rinsed my screen and dried it and tried again.
7. I used the ink that came with it quick. Get extra ink! lol I made a ton of prints. It was so much fun.
8. Most Importantly. Clean your screen and squeegee right after use. The ink dries very quick. The longer you wait to clean it the harder it is to clean. If you leave the ink on the screen too long you will ruin it.
2. Have plenty of paper towels handy.
3. When you go to use the ink. Remove the inside foil so the ink will come out. lol
4. Have a scrap piece of paper handy to lay your squeegee down on between prints.
5. Have all the paper you want to print on cut and ready so you don't waste time between each print that you do. The ink dries fast.
6. Do not become discouraged if your first few prints do not turn out. I did three before I got a good print. It takes a few tries to figure out the pressure you need to use to get a clear print. Also if you get globs (your print is not clear) You are using to much ink. I rinsed my screen and dried it and tried again.
7. I used the ink that came with it quick. Get extra ink! lol I made a ton of prints. It was so much fun.
8. Most Importantly. Clean your screen and squeegee right after use. The ink dries very quick. The longer you wait to clean it the harder it is to clean. If you leave the ink on the screen too long you will ruin it.
What I used to make the card:
Birdcage image screen and Sentiment screen that came with my Yudu Cardshop HSN version.
Tan card stock, black card stock and light blue card stock.
Blue brads on the four corners of the birdcage screen print.
Foam dots to pop up the birdcages and sentiment.
Blue shades of paper flowers and rhinestones in their centers.
I will post more cards from this as I complete them.